
Imagine coming home to spotless floors without lifting a finger. What if you could build a floor cleaning robot yourself, tailored to your needs and budget?
You don’t need to be a tech expert or spend a fortune. This guide will show you step-by-step how to create your own floor cleaning robot, saving time and effort every day. Keep reading, and you’ll discover simple tricks and tips that make this project surprisingly easy and rewarding.
Ready to transform your cleaning routine? Let’s dive in!
Credit: www.dalpozzo.com.br
Choosing Materials
Choosing the right materials is key to building a good floor cleaning robot. The materials affect how well the robot works and how long it lasts. Picking strong and light parts helps the robot move easily and clean better.
Also, using the right tools makes building the robot easier. It saves time and helps put parts together correctly. Good materials and tools lead to a robot that cleans floors well every time.
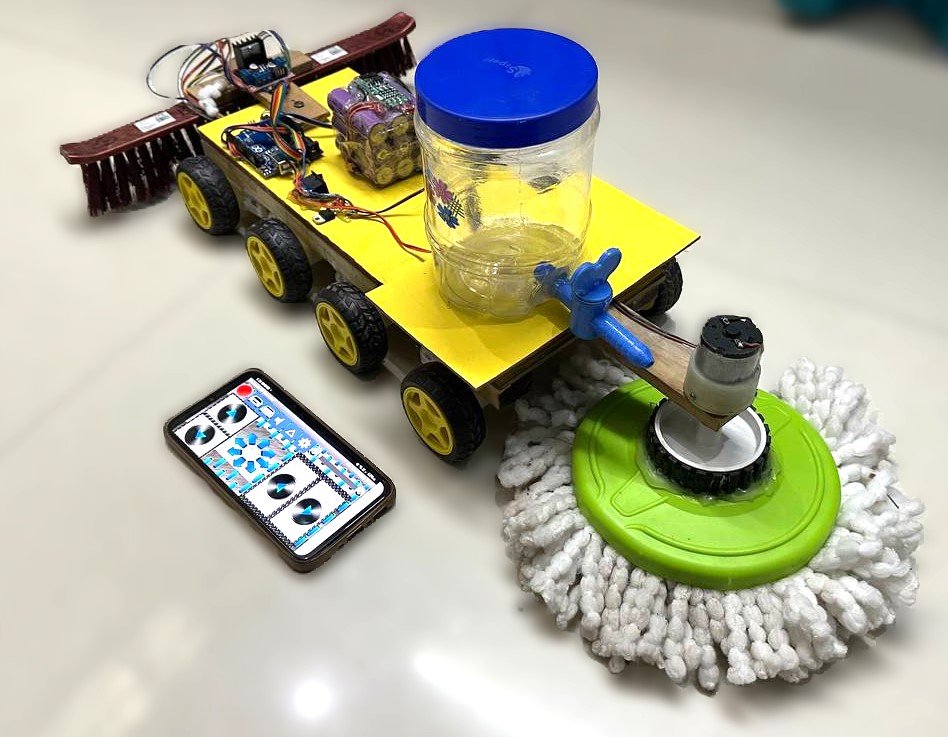
Essential Components
Start with a strong frame to hold all parts firmly. Use lightweight plastic or metal for the body. Add wheels with rubber tires for good grip on floors. A small motor will power the wheels and brushes. Choose brushes that can pick up dust and dirt easily. Include a battery that lasts long but stays small.
Recommended Tools
Use a screwdriver set for assembling small screws. A soldering iron helps connect wires tightly. Pliers can hold parts steady while working. A multimeter checks electrical connections and battery levels. Cutting tools like wire cutters prepare wires neatly. These tools make building safer and faster.
Credit: ai.thestempedia.com
Assembling The Base
Assembling the base of your floor cleaning robot is the first step. This base acts as the robot’s body. It must be strong and balanced. A good base keeps all parts steady during cleaning. Follow these simple steps to build a solid base.
Building The Frame
Start with a flat, sturdy material like plastic or wood. Cut it to the size you want for your robot. The frame should be wide enough to hold the motors and battery. Use screws or glue to fix the edges. Make sure the frame is firm and does not wobble. A strong frame supports all the components well.
Attaching Wheels And Motors
Pick wheels that fit your frame size and surface type. Attach the motors near the wheels. Use brackets or mounts for a secure fit. Connect each motor to a wheel tightly. Check that the wheels turn freely and smoothly. Proper attachment helps your robot move easily on floors.
Installing Sensors
Installing sensors is a key step in making a floor cleaning robot. Sensors help the robot detect obstacles and navigate rooms. They gather data from the environment, allowing the robot to clean efficiently. Proper sensor installation ensures smooth movement and avoids collisions.
Types Of Sensors
Choose sensors based on the robot’s tasks. Infrared sensors detect edges and walls. Ultrasonic sensors measure distance using sound waves. Bump sensors sense physical contact with objects. Light sensors help the robot avoid dark areas or stairs. Combining different sensors improves accuracy and safety.
Mounting And Wiring
Place sensors where they get a clear view of the surroundings. Mount infrared and ultrasonic sensors near the front. Attach bump sensors around the robot’s edges. Use small screws or brackets for secure mounting. Connect wires carefully to the control board. Keep wires tidy to avoid tangles or damage. Test each sensor after installation to confirm proper function.
Programming The Robot
Programming a floor cleaning robot is key to its success. This step controls how the robot moves and cleans your floors. Good programming makes the robot smart and efficient. It helps the robot avoid obstacles and cover every corner of your room.
Basic Coding Tips
Start with simple code. Use clear and short commands. Test the code often to find mistakes early. Use functions to organize tasks like moving or turning. Keep your code clean and easy to read. This helps you fix problems faster. Choose a programming language that fits your robot’s hardware.
Navigation Algorithms
Navigation guides the robot’s path. Use sensors to detect walls and objects. Algorithms like random walk or wall following work well. You can use grid mapping to plan cleaning routes. Make sure the robot covers all areas without repeating too much. Add obstacle avoidance to prevent crashes. Good navigation saves battery and cleans better.
Testing And Troubleshooting
Testing and troubleshooting are key steps after building your floor cleaning robot. These steps ensure your robot works well and cleans efficiently. Early tests help spot problems early. Fixing issues improves your robot’s performance and lifespan.
Initial Test Runs
Start testing on a flat, clear floor. Turn on the robot and watch its movements. Check if it follows the planned path. See if the brushes spin and the vacuum works. Listen for unusual noises or vibrations. Test battery life by running it until it stops. Note any areas where it gets stuck or misses spots. Record these observations for troubleshooting.
Common Issues And Fixes
Robot does not start: Check battery charge and power connections. Motor runs but robot does not move: Inspect wheels for blockages or loose parts. Brushes not spinning: Clean brushes and check motor wiring. Robot gets stuck often: Clear floor of small objects and adjust sensors. Short battery life: Replace old battery or reduce run time. Robot misses spots: Adjust navigation settings or add more sensors. Strange noises: Tighten loose parts or lubricate moving components.

Credit: www.youtube.com
Frequently Asked Questions
What Materials Are Needed To Build A Floor Cleaning Robot?
You need motors, sensors, microcontroller, wheels, battery, cleaning brushes, and a frame.
How Does A Floor Cleaning Robot Navigate Rooms?
It uses sensors like infrared or ultrasonic to detect obstacles and map the room.
Can I Program The Robot To Clean Specific Areas?
Yes, with a microcontroller and coding, you can set cleaning paths and zones.
How Long Does The Robot Run On A Single Battery Charge?
Most run between 60 to 120 minutes, depending on battery size and motor power.
Is It Difficult To Assemble A Floor Cleaning Robot At Home?
Basic electronics knowledge helps, but many step-by-step guides make it easier for beginners.
Conclusion
Building a floor cleaning robot can be simple and fun. You just need basic parts and some patience. Step by step, you create a tool that helps keep your home clean. This project teaches you about robotics and problem-solving. It saves time and effort in daily chores.
Everyone can try this, even with little experience. Start small, learn as you go, and enjoy the process. A homemade robot shows how technology fits in everyday life. Give it a try and see the results yourself.