
Best way: Vent the bathroom exhaust fan straight outdoors with a short, insulated duct and proper cap.
I’ve installed and inspected many home ventilation systems, and I’ll walk you through the best way to vent a bathroom exhaust fan. This guide explains why venting outdoors matters, compares roof and wall venting, covers sizing and code basics, and gives step-by-step instructions and troubleshooting tips. By the end you’ll know the best way to vent a bathroom exhaust fan for performance, durability, and code compliance.
Why proper venting matters
Venting a bathroom exhaust fan correctly prevents mold, mildew, paint damage, and rot. The best way to vent a bathroom exhaust fan removes moist air directly outdoors. Indoor venting into attics or crawlspaces leads to moisture buildup and structural problems. A properly vented fan improves indoor air quality and extends the life of finishes.
I’ve seen dozens of attic mold cases caused by improper fan venting. Fixing them costs far more than installing the vent right the first time. The following sections show methods, step-by-step installation, code considerations, and maintenance. Follow these to get the best way to vent a bathroom exhaust fan in your home.
Best venting methods and when to use each
There are three common ways to vent a bathroom fan: roof vent, sidewall vent, and through-cabinet or soffit vent. Choosing the best way to vent a bathroom exhaust fan depends on roof layout, attic access, and local code.
- Roof vent
- Good for bathrooms in the center of the house.
- Run duct to a roof cap with a backdraft damper.
- Avoid long runs and steep bends.
- Sidewall vent
- Ideal when the bathroom is on an exterior wall.
- Short, straight duct runs are easiest and most efficient.
- Soffit or eave vent
- Generally not recommended as the best way to vent a bathroom exhaust fan.
- Moist air can be drawn into the attic or soffit and cause problems.
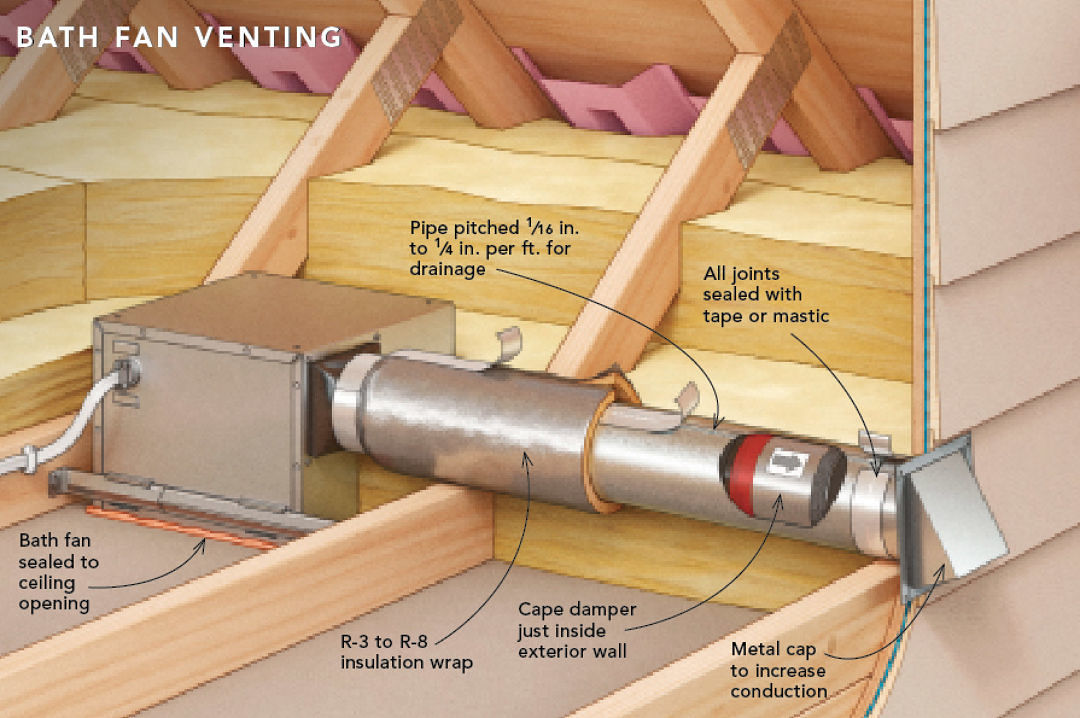
In most homes, the best way to vent a bathroom exhaust fan is a short duct to an exterior wall or roof cap. Short runs reduce noise and condensation. Insulate ducts in cold climates to reduce condensation inside the duct.
Duct type, size, and insulation: technical choices that matter
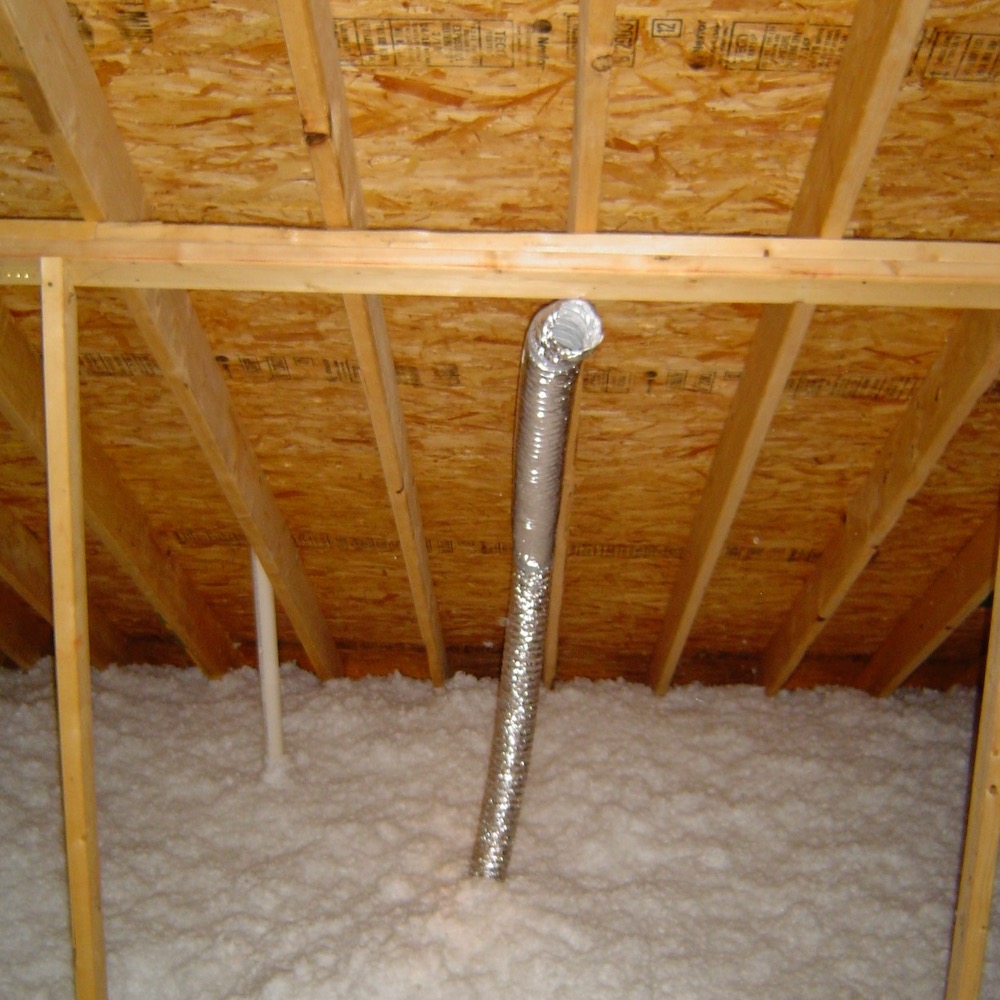
Choose the right duct to get the best way to vent a bathroom exhaust fan. Use smooth rigid ducts when possible. Avoid flexible accordion ducts for long or permanent runs.
- Duct type
- Rigid galvanized or smooth aluminum ducts reduce resistance.
- Use metal ducts for long runs; flex duct only for short final connections.
- Duct size
- Match the duct diameter to the fan’s rating. Most fans need 3-4 inch or 4-6 inch ducts.
- Oversizing can reduce airflow velocity; undersizing increases noise and reduces flow.
- Insulation
- Insulate ducts that run through unconditioned spaces.
- Insulation prevents condensation in cold weather and frost in winter.
If you want the best way to vent a bathroom exhaust fan, measure the fan’s CFM and follow the manufacturer’s duct size chart. Longer ducts and multiple elbows need larger diameter and may require a more powerful fan.
Step-by-step guide: how to vent a bathroom exhaust fan
Follow these steps to vent a bathroom exhaust fan the right way.
- Plan the route
- Pick the shortest straight path to the outdoors. Avoid attic penetrations if you can vent through a wall.
- Choose the exit point
- Use a roof cap for center-of-roof runs or a wall cap for exterior walls.
- Select duct material and size
- Use smooth metal duct sized to the fan’s CFM rating.
- Install the fan and duct
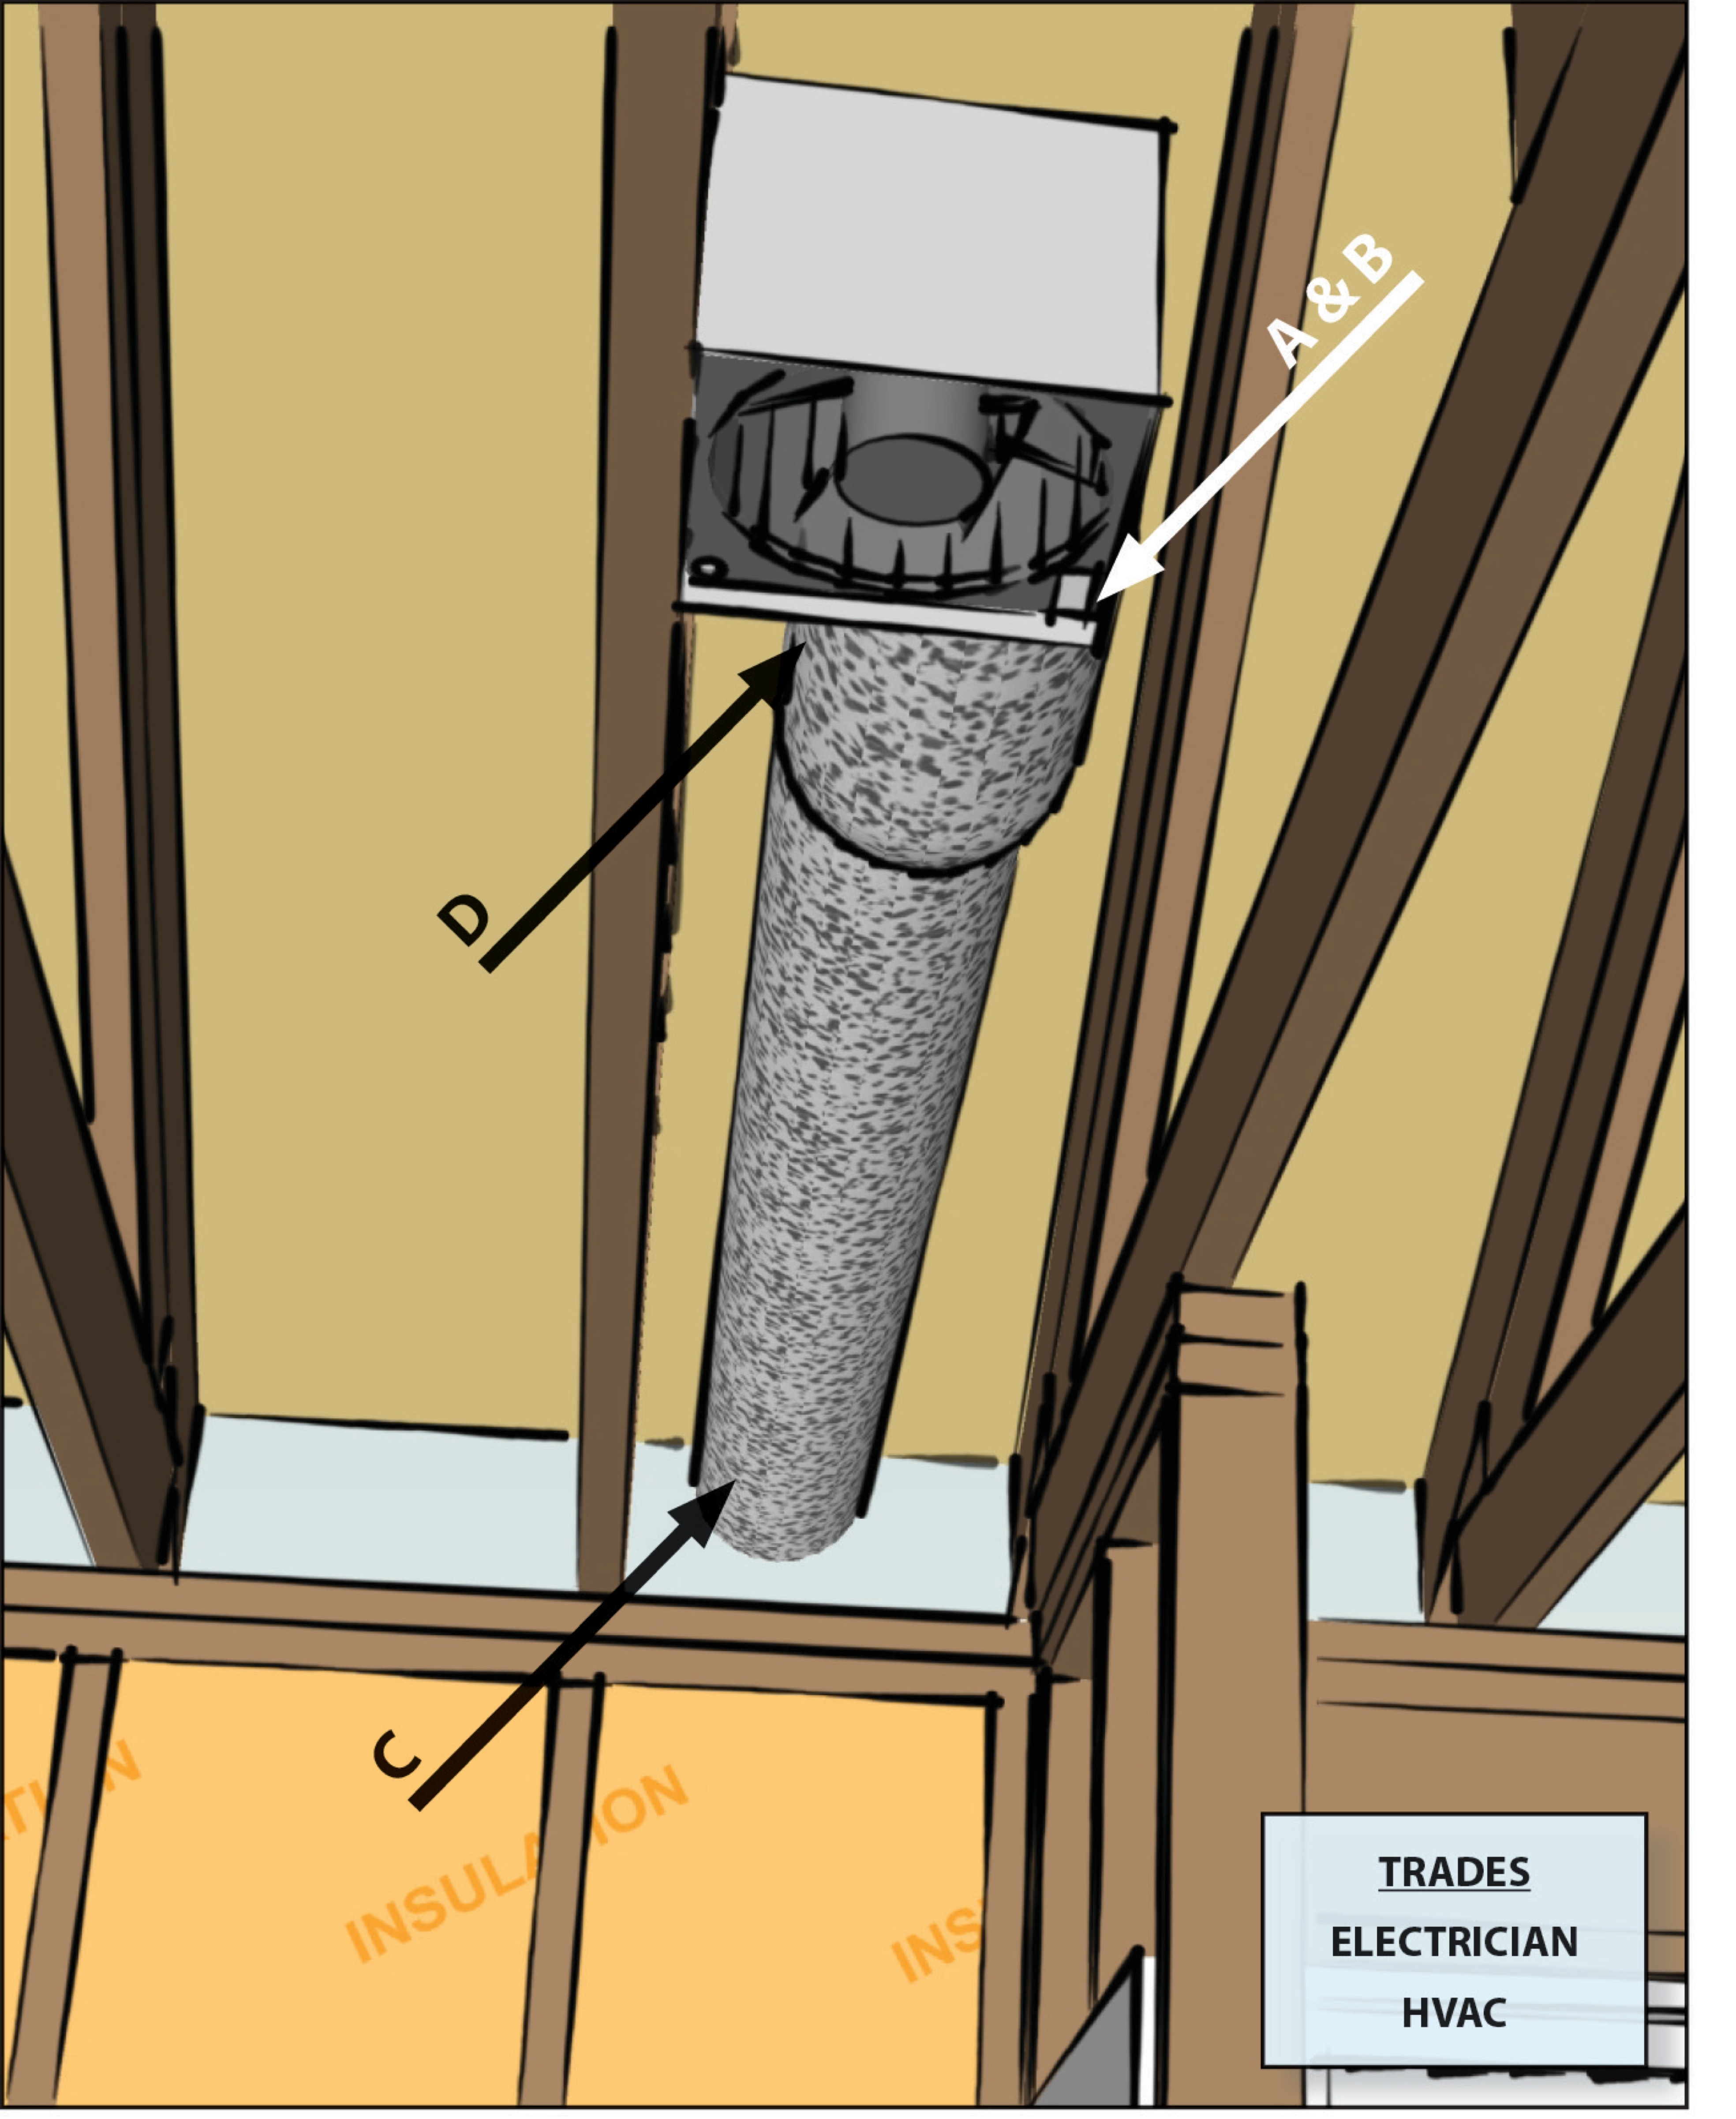
- Attach duct to the fan with a metal clamp and foil tape. Don’t use duct tape.
- Add a backdraft damper and termination cap
- Ensure the cap has a bird screen and a spring damper to prevent pests and backflow.
- Seal and insulate
- Seal joints with approved foil tape. Insulate ducts passing through cold spaces.
- Test airflow
- Run the fan and check airflow at the cap. Confirm no leaks and that the damper closes.
I once replaced a long flex duct with a smooth aluminum run and the fan’s performance improved immediately. Short, direct runs are the best way to vent a bathroom exhaust fan in any home.

Common mistakes and how to avoid them
Avoid these frequent errors to ensure you get the best way to vent a bathroom exhaust fan.
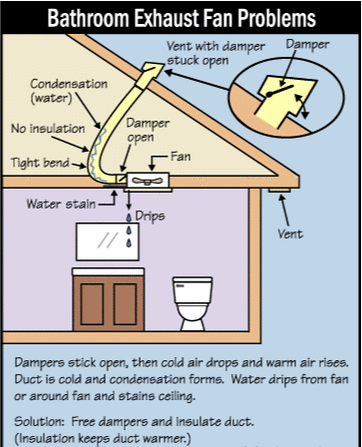
- Venting into the attic or crawlspace
- This traps moisture and causes mold. Always vent outdoors.
- Using long, twisty flex duct
- It lowers airflow and traps moisture. Use smooth metal duct for main runs.
- Skipping insulation
- Uninsulated duct in cold spaces will condense. Insulate when needed.
- Forgetting a backdraft damper or screen
- Cold air, rodents, and insects can enter without them.
- Undersizing duct or fan
- Measure CFM needs and match duct size to prevent poor performance.
These mistakes are common. I’ve corrected many installs with these fixes. Doing the job right saves time and money later.

Building code, permits, and sizing basics
Local codes often require that bathroom fans vent outdoors and have backdraft dampers. Always check local rules and get a permit if required. Code sources generally dictate:
- Minimum ventilation rates based on bathroom size and fixtures.
- Termination location clearances for roof and wall caps.
- Use of a backdraft damper on exhaust vents.
Sizing the fan:
- Calculate required CFM: a common rule is 1 CFM per square foot for small bathrooms, but local codes or manufacturer specs may differ.
- For toilets and showers, many pros recommend 50-100 CFM for standard bathrooms.
- Long ducts and extra elbows may require a higher CFM fan to maintain performance.
Consult local authorities or an HVAC pro if unsure. This ensures compliance and helps you pick the best way to vent a bathroom exhaust fan for your house.

Maintenance and troubleshooting
Regular maintenance keeps the venting system working well. Follow these simple steps to maintain the best way to vent a bathroom exhaust fan.
- Clean the fan grille every 3-6 months to remove dust and lint.
- Inspect the exterior cap yearly for blockages, nests, or damage.
- Check the damper to ensure it opens and closes freely.
- Replace worn or crushed ducts and reseal joints if you find leaks.
- If airflow is weak, measure CFM and inspect for long runs or excessive bends.
If you hear rattles, check the cap and damper. If moisture still forms on windows, reassess duct routing. In my experience, a clogged exterior cap or crushed flex duct causes most issues.
Frequently Asked Questions of What is the best way to vent a bathroom exhaust fan?
How far should a bathroom exhaust fan vent go?
The duct should be as short and straight as possible. Longer runs need larger ducts or higher CFM fans to maintain airflow.
Can I vent a bathroom fan into the attic?
No. Venting into an attic traps moisture and leads to mold and rot. Always vent directly outdoors.
Is it okay to use flexible duct for venting?
Use flexible duct only for short final connections. Smooth metal duct is best for the main run to reduce resistance and condensation.
Do I need a backdraft damper on the exhaust vent?
Yes. A damper prevents outside air, pests, and cold drafts from entering when the fan is off.
How do I size a fan for my bathroom?
Check local code and the fan manufacturer’s recommendations. Common advice is 1 CFM per square foot or a minimum of 50 CFM for small bathrooms.
Can I vent through the soffit?
Soffit venting is not recommended for the best way to vent a bathroom exhaust fan because moist air can be drawn into attic vents. Avoid soffit exits if possible.
How often should I clean the vent cap?
Inspect yearly and clean as needed. Remove debris, nests, and lint to keep airflow optimal.
Conclusion
Venting a bathroom fan correctly means routing the fan straight outdoors, using smooth metal duct sized to the fan’s CFM, adding a backdraft damper and cap, and insulating ducts through cold spaces. Choosing the best way to vent a bathroom exhaust fan reduces moisture damage, cuts maintenance, and improves comfort. Start by planning the shortest path outdoors, follow local code, and do simple annual checks. Ready to fix or upgrade your venting? Try one change today—shorten the run, add insulation, or replace flex duct—and notice the difference. Leave a comment with your venting challenge or subscribe for more practical home-ventilation tips.